CLICK HERE FOR FREE BLOGGER TEMPLATES, LINK BUTTONS AND MORE! »

Friday, August 28, 2009

Jobie's Word Book


Job's Daughters is also referred to as "Jobies". I wanted to mess around with a word book so I decided to put this together. I followed The Pink Stampers idea of using poster board for this. I think it turned out pretty good but I think it would have been sturdier if I had covered the poster board with card stock instead of thin paper (its the only thing I had in purple). Purple and white are our colors. I decided to go forward with it anyway. I'm going to give it away to one of the girls at the next meeting. I think pink goes great with purple, so therefore the color combo. I didn't have a Bind-it-All when I put this together so i just used ribbon. I now have a BIA and I can't wait to use it!! I hope you can see the stickles and embossing in the pix.

I'm working on another book using chip board. It's turning out okay so far but I think I need the deep cut blade. I will finish that up once I get that.

Heritage Park SB Layout


Here is a layout that I did for the group's scrapbook. On this adventure the girls went to a park in Cerritos, CA. At this park there is an island that has the slide and some of the other stuff you see in the pix (page on the right). Unfortunately on this day the island was closed for maintenance. The girls "broke in" and had a blast (I was there snapping pix... apparently I am the new historian for the group). Right behind us many other folks joined us (until we were kicked out by park maintenance folks). My favorite pic is the one with the girls behind the bars (it's their favorite too).... don't they look sad? LOL. I printed these pix out on my printer so I printed them smaller than you usually get. I think it's the wallet size.
I used "Walk in My Garden" for the flowers, post, butterfly and caterpillar. Don't remember where the fence and grass came from and the balls came from "Life's a Beach". I know I did use DS to make the grass and fence connected and long enough for a "border". Everything is from Cricut carts.

Boomers SB Layout


Here is our trip to Boomers. I'd already purchased a stack of paper that included the paper that I used for these layouts (I liked the color of the paper.... love bright and cheerful colors). When trying to figure out what background paper to use I thought the "bubbles" or circles worked really well for the pix of the girls in the water (they came out soaking wet) and the shapes worked great for their trip around the track (the shapes reminded me of street signs). I cut out circles in different sizes and colors to represent water drops on the first one and then the street shapes for the go-cart layout. "Boomers" in the circles also represents water drops. "On Your Mark! Get Set! Go!" is done in black and white to represent the checkered flag. The "flags" for the border are from the Zoobaloo cart and welded together on DS. I had to do this a couple of times because the first time I made it too long (one of the drawbacks of DS and the E.... won't cut exactly 12 inches). They are simple layouts but I think cute.

Los Angeles Zoo SB Layout


Finally, here is the layout I did for the LA Zoo using Zoobaloo. This is the first time I did this layout and it was challenging because of the kind of cardstock I was using (textured). The creatures and thinner letters are better cut out on non-textured cardstock (or minimally textured cardstock or cardstock that has a smooth side on the back and using the "Flip" selection on the E and cutting with the smooth side up) to avoid ripping. Believe it or not I really like the semi-textured cardstock (smooth on the back side) that you can get at Walmart for (I think) about $8 or $9 dollars for a 12 x 12 stack of 50 sheets (as compared to the DCWV cardstock for $19.99 which I have tons of because I love their colors). I've found that the Walmart paper cuts a lot easier.
I love the "Which way did they go?" part of this layout (I used DS to weld the letters... so much easier). I didn't realize it when I was taking the pictures but it worked out perfect with the Meerkat looking in all directions. If you look up above the girls are "popping up" out of the ground (inside of those bubbles) and in the picture on the top right one of the creatures (I don't think it's one of the Meerkats) is actually popping out of a hole. This was a fun layout to do!! I didn't have a lot of pictures of the girls. My daughter took tons of pix of the animals.... they are cute but......


Here is the second time I did this layout for the same activity (wow, took much less time since I knew exactly what I was doing and what paper I wanted to use). I'm in charge of keeping up with the group's scrapbook so I recreated the same layout (CVS was having an issue with printing out pix so I ended up with double prints for free) but this time I didn't have the stickers so I used the Zoobaloo cart to create the extra animals. I think the "Welcome" is from Walk in My Garden (one of my favorite carts!! I've used it A LOT!)

Thursday, August 27, 2009

Alice in Wonderland SB Layout


Job's Daughters is an international organization. California is one of the largest jurisdictions so we have a Grand Guardian for the State of California. Each year she visits each individual group in the state. This layout is from her visit. I'm sharing this one because I love Alice in Wonderland which was our theme for her visit plus I loved how this layout turned out (and the colors.... I'm like The Pink Stamper, I love pink (and purple)). The background paper is a Disney paper. For center pieces we used "presents" so thats why the pictures are framed in wrapped packages. I made a mistake and accidently added another letter before the GGOV so I had to rip that letter off (I used permanent glue and it ripped the paper so I added the extra present... it happens). All of the Alice in Wonderland stuff are stickers. Of course the Cheshire cat had to be in a tree! This is one of the times I didn't have a lot of pictures so I could do more with the layout. I don't remember which cart the grass is on but I used my DS to connect them and make a border.

Mountain Trip SB Layout


In February the girls went to the mountains. We went the weekend after a huge storm. My 17 year old son (16 then) went the weekend of the big storm (with a driver his same age). Talk about being nervous! There was tons of snow and I took over 200 pictures over 2 1/2 days. Most of them of the girls sledding down a hill we found close to the lodge where we were staying. They had sooooo much fun. This is only the first layout of 4 that I did for this activity. I may share some of the other layouts later. (I got tired of taking pictures). LOL

Disney Princess SB Layout


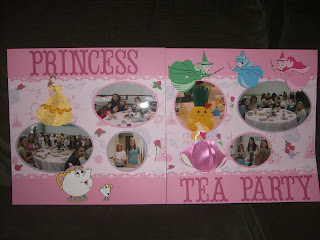
This is from the same scrapbook. The theme for my daughter's "term" as the leader of the group was Disney Princesses (she is a Disney freak). As soon as I got my Cricut I knew I had to have to the Disney Princess carts. I think they were the first carts that I purchased besides the ones that came with my Cricut.


This is my first attempt at layering. Those tiny pieces are murder! I think they turned out pretty good.


Second layout. While doing this project sometimes there were just too many pictures to fit in one layout. Plus it let me use each of her favorite Disney Princesses and some of the associated characters. Her favorite is Belle. That's why she is first!

Happy Easter SB Layout


My daughter is in a Masonic youth group called Job's Daughters. She was the leader of her group from last December through this past June and it's tradition that she receives a scrapbook with pictures and stuff from her meetings and activities. I finished the scrapbook this summer (late) but at least it's done. So now I'm going to start posting pictures of my layouts. Please be gentle.... these were my first attempts at using an Expression (or any Cricut product) and the first time I had scrapbooked in a LONG time!
I did this layout with A Walk in My Garden. The clouds were made by using a design in Storybook and combining them in DS. I think the font is Alphalicious. Thanks for taking a look.